Welcome to ESP8266 MQTT broker BONDAR.
1.Start by creating an account.
2.Activate your account.
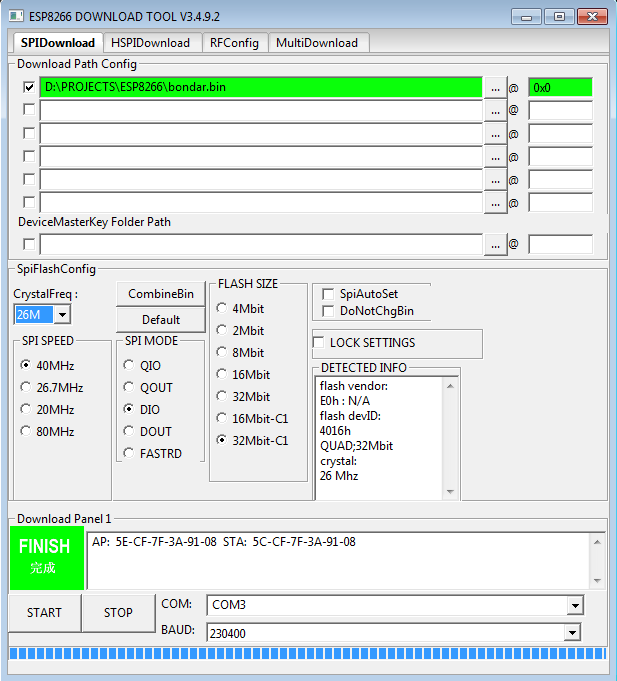
3.Download the bondar.bin (right-click and Save Link as..) to your ESP8266 starting from address 0x0.(Use esptool.py or ESP Flash Download Tool)
On Linux:
sudo esptool.py -p /dev/ttyUSB0 --baud 9600 write_flash -fs 32m-c1 -fm dio -ff 40m 0x00000 bondar.bin On windows use Flash Download Tool (right-click and Save Link as..).
4.ESP8266 will start in AP mode(use 12345678 for password in AP mode). Go to 192.168.4.1 in a browser after you have connected to the Bondar_xxxxxxxxxx AP. Enter your Wi-Fi credential and the user and password used on IoTCentral.eu
5.Reset the ESP8266. Unplug and then plug the power cable. This step is mandatory!
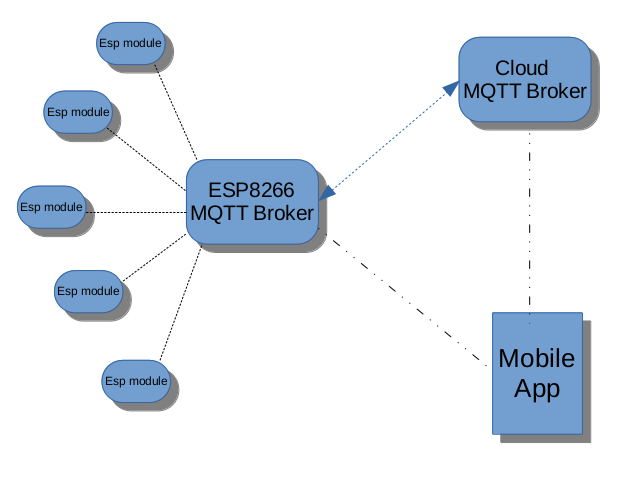
Login to your home page on IoTCentral.eu and you will see your allocated topic. Use allocated_topic/your_topics to connect to iotcentral.eu:1883 and /allocated_topic/your_topic to connect from your Wi-Fi network.
Always use your email address and the password used on IoTCentral.eu to publish and subscribe. In this way your data is protected and no one will get access to your data since the topic is secret and you are using your username and password to publish and subscribe to the cloud.
Example:
1.From your Wifi network publish to
/fer76543/temperature message {"temp":"23.4"} and subscribe to iotcentral.eu:1883 to topic fer76543/temperature
to receive your message.2.From your phone ( or your Iot/MQTT application) publish to fer76543/relay the message
{"relay":"1"} and you will receive it to the ESP8266 that subscribed
to /fer76543/relay topic3. To receive all the messages subscribe to iotcentral.eu:1883 topic
fer76543/# or from your Wi-Fi network to /fer76543/#.4. For Arduino IDE you can use PubSubClient and ArduinoJson.
5. Use:
curl "http://iotcentral.eu/getme/iot?u=email@example.com&
p=528aa9748867e51fe9e8612658424328&t=lamp&i=192.168.1.77&m=5C:CF:7F:84:4F:B9&v=1003"
and you will get {"ukey":"a604be34cd054f5b","utopic":"fer76543","userver":"192.168.1.7","uport":1883,"ver":"1004"}so your home devices should connect to the Bondar Mqtt broker which has IP:192.168.1.7 on the port 1883 and on the topic
/c5c05218/YOUR_TOPIC6. If you devices need to comunicate between them over the Bondar MQTT broker inside your Wi-Fi network you don't need to provide an user and password
7. If you need websockets connectivity to the Bondar MQTT broker you need to connect to 1883 ( yes the same port). Also your MQTT cloud server is accesible over websockets on port 9004.
8. A fully functional example can be found at https://github.com/bcatalin/demoapp . It is a plug that can be controlled with your voice and an Amazon Echo.
How to:
Q1: I want to create a device that will send data to my broker. How do I know the IP address of the broker and the base topic ?
A1: You need to access the link: and you will get a JSON with all the necessary data (your local broker IP and port, base topic)
http://iotcentral.eu/getme/iot?u=YOUR_EMAIL_ADDRESS&p=YOUR_MD5_PASSWORD&
i=YOUR_IP_ADDRESS&m=YOUR_MAC_ADDRESS&v=YOUR_SW_VERSION&t=YOUR_BOARD_TYPE
JSON response will be like:
{"utopic":"fer76543","cip":"iotcentral.eu","cpo":"1883","cu":"halogensoft@gmail.com",
"cpa":"528aa9748867e51fe9e8612658424328","ver":"1000","act":"Y"} where:utopic - is the base topic
userver - is the cloud broker instance
uport - is the port of cloud broker (1883)
ver - your sw version